Hello friends, welcome to our website. On this website, I upload all kinds of tricks and news, editing technology-related articles. Try to follow daily. Al, so in this article, let’s know about a good best photo editor. How to edit this photo with AI, but manually with applications that every single beginner can use the First, let’s know how to edit with AI.
How to do photo editing with AI tools
AI is an artificial intelligence it saves us a lot of time it can do the work of hours in a few seconds in a few minutes not only for photo editing but in starting it is designed for our works for articles for text for questions in this we ask you any question it will give you an answer immediately in seconds in seconds no matter what kind of logo or design whether you are your company or if you are a student Questions Either itanswerso many such questions within a few seconds, it works as one of our best intelligent assistants, if you are a student, it follows 100% of the questions related to every subject, it answers the work that no one can do so fast, it answers within a few seconds, it has been trained and developed in this way, now we have many such tools in Google. There are some of the best trades that we use regularly, and we can do photo editing in the meantime, but how to do this photo editing means you need to create a prompt before doing photo editing. This area is about giving a text in a language tthatthatrstand how you want to do photo editing. This text can also be asked to create it. For example, open a tool and click on the plus icon in the second. If you want to edit the style of that photo, then select the style of your photo and then select your photo next to it. In the same way, the same photo should come in the second photo so that it can be understood, so if it is said correctly in the language that it understands, it will be created immediately in a few seconds, but some tools take a few minutes. According to he current technology, it takes only a few seconds.
Photo editing using apps
So far we have edited with AI, but as much as we edit with these tools, if we edit manually with applications, it will waste a lot of time, there will be a doubt whether it will come out perfect in the last, so now let’s know how to edit manually, but if you want to edit this manually, you need to use software if on computer, if on Android mobiles, applications. So in this application, I will explain to you some of the best applications about it. The application that I use the most is Alight Motion. This is a video editing application in which we can also do photo editing. First of all this application is available in play store open this application then click on the plus icon in it then click on create project and again click on the plus icon in green color then click on media option then select a photo from the gallery you need to select the ratio you want the photo in advance then you have to click on that photo then you have some options If it appears in it, click on the main important effect option, then go to the search option at the top, then you have to color the first color of this photo, so select the effects related to any color or search for color in the search, you will get many effects, select any color that you want to set for the photo, then click on the stand-odd setting option. There are many options available, and there are also many buttons. Use these buttons to see how your photo looks, how bright the lighting is, and apply it using this option. Then, if you want to apply overlays to this photo, it is better if you take any blackscreen-related images or PNG images for this, but you have to prepare them and then click on the media option and add some overlays from the gallery. Click on the Over Less option or click on that layer and click on the Blending and Opacity option on the right side, and there are many blending options. In that you have to apply overlays using Lighton or screen option, nd then if you want to apply any particle effect to them, for this you can select your photo and go to effects and search for particle-related effects and apply the effects. Even after applying the particles, again click on the share option at the top, and if you want to save this photo, there you will see an option named Sequence. Click on it and you will save the final option automatically, a nd you will save a photo in HD quality. But last and fi, if you want your photo to come in HD qua, then you need to apply another effect, the effect called Sharpness. So now let’s know how it will be if we edit these articles manually with AI tools, and if you have any doubts about this, then please comment on what kind of articles you want. Now, some AI features have been added to the website or applications, which makes our editing much faster. Before this feature was available, every editor faced a lot of difficulties when they wanted to edit. Now, with this feature, they are editing at the right time very easily. They are also doing new editing in it. These options are very useful for them. Let’s hope that more updates will come with these features in the future. In this application, apart from video or photo editing, you can also animate them using the shapes in it. In the same way, using those shapes, you can do professional animation editing in our project, like a cartoon, with the help of key frames. Nothing in this is ready-made. Everything has to be edited manually as we like. There are tools in this to edit things like transitions and effects as we like.
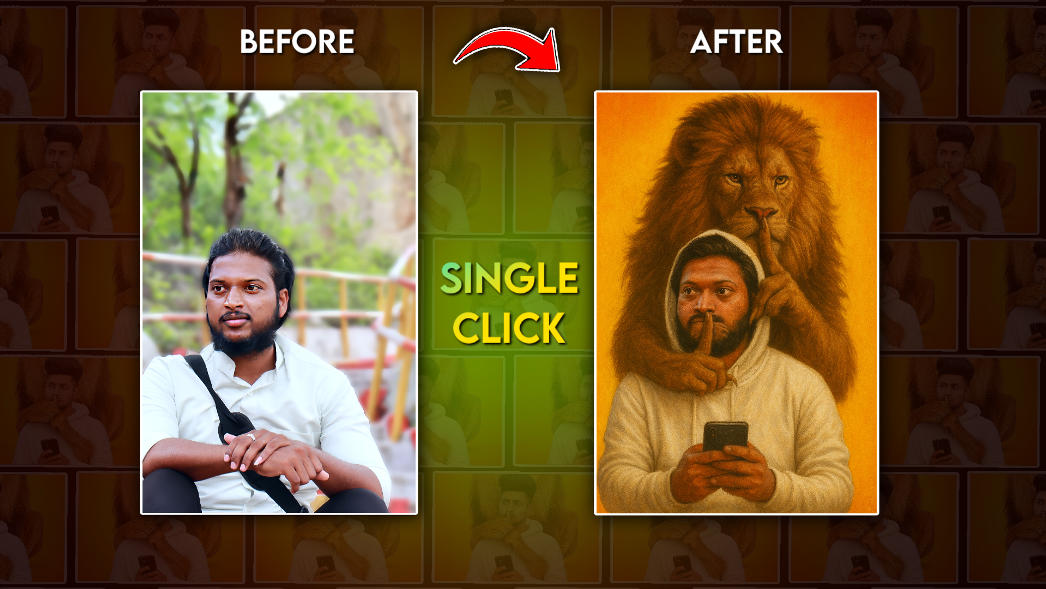
Prompt Here
Use this image to create “A wearing a white hoodie and holding a smartphone, stands in front of a vibrant yellow-orange gradient background. A large lion with a majestic mane is perched behind him, placing one paw over the man’s mouth and holding a clawed finger to its lips in a “shh” gesture. The image has a surreal and humorous tone, blending realism with fantasy. face and body should be original as I uploaded image”