Hello friends, welcome to our website. Today’s topic is colour grading on mobile, ILE and that too for photos. Usually, we can do this colour grading by using apps as well as websites and some software. We also have some software to collect professionally, so it becomes easy for us to collect easily on mobile. In this, the app is a simple and mobile-friendly application in which we can easily edit colour grading and also create presets.
However, in this, we can save and share that preset for colour grading.
Or if someone makes free sets and wants to use them after making them, for this, we should use the VN application views. This application is available in the Play Store. Search for and install this application. After installing, open this application and import any photo or video. After selecting the photo or video, some options will appear below. Among those options, there is an option called Filters. Click on it. Then an option called Import Filters will appear. There are many filters in these. You can use them, or you can also use other filters of your choice. If you import them using the Import option and click on them, that filter will be applied to the photo or video. In this way, we can apply filters very easily.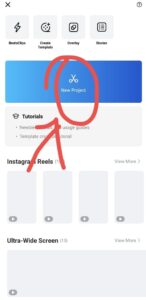 We have many applications for colour grading this photo or video, but they are fake applications. So let’s learn step by step in this article. Read this article completely and learn. I will explain to you again from the start. Read the article clearly and completely. First, after you open this application, the interface will open for you. In it, first click on the plus icon, then click on New Project and select any image or video. After that, the gallery will open. Select it from the gallery and open it. Here again, it will directly take us to the timeline. In this timeline, we have four layers, two of which are related to music. The remaining two layers are related to media. In this, we will see an option called filter to collect. Click on this option. Also, after reaching the end of the photo or video you have taken, a block of files will appear there. Click on that file. Then three options will appear below. There is a delete option. Click on that option and delete that file. Because it is not of much use to us. Now, after clicking on the filter option, there are many options in the filters here, among them are Favourite, Original, Authentic, Create and Viv. Some types of filters are visible here. In these, we can add the filters we like specifically, and in each filter, there are many options in each option, and we can also edit them using them. For example, there are options such as increasing or decreasing brightness, but also contrast. Apart from this, we will see an add button to add filters as an extra. When you click on this add button, if you have any filters saved on your mobile or media, click on this button, select and import that filter file. By doing this, that filter will be added to this app. You can easily apply this filter to a video or image, but some of these filters require you to pay money, while others are free. If you want to improve your fashion or your editing skills, or if you want to improve your colour grading, you can buy these filters for a fee.
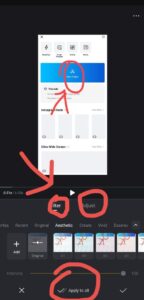 Later, when we apply these filters, we mentioned above that each filter has some options. Similarly, when we click on a filter, two options will appear: the latter and adjustment. So this filter can supply the filter that is normally in it. As we have seen so far, there is n option called Adjust that will appear. In these options, we have many options to edit and colour rate, including Contraction Highlights and Temperature Shadows. Some of the options we see are. This is the best colour grading app because these tools are very easy to use. When we apply this, we have to change these settings depending on the lighting of the image or video. In this, the option called HSL, as an expression, exposure and temperature are very important. In this HSL option, there are some more options, namely Hue and Saturation and Lightness. These three are also very important for us, and all the colours related to them are on top. When we select each of the colours, there are three options related to it. Let’s see how we can use these three to make tcolourlor rating very good. Among the other options, we have an option called Charger or Curve. If you increase it, you will see the result there. When you boom and speak it, you can see its result on the display screen. After doing this, you can apply these consequences to all slides, that is, to all media files immediately, or you may follow the best those you need.
By selecting each one, after applying colours to all media files, we will see the share option at the top. Click on this option, and some more options will appear. In these options, the reservation, frame rate, and bit rate will be visible. You have to select the quality of your video and then click on the save or export option. This will take some time. The loading time could be one hundred for them. After that, click on the shop alternative, and you can shop for this video in your media gallery. In this way, we can colour grade every video very simply. If you have doubts about this article, ask in the comments section below. Subscribe to our website now for more colour grading and interesting to, and you can also tell us what kind of articles you want in the comment section. Thank you.