Capturing a family portrait is greater than just snapping a photograph—it’s approximately retaining moments that count, freezing emotions, and crafting memories that last a lifetime. In the world of digital images, the magic does not stop at the click of the shutter. The real transformation regularly occurs during the modifying method.
Studio family photo enhancing plays a critical function in turning a well-shot picture into a stunning, undying masterpiece. Whether you are a professional photographer, a passionate hobbyist, or a person trying to decorate your circle of relatives albums, mastering studio enhancing techniques could make a global of difference.
In this manual, we will explore everything you need to understand to create beautifully edited studio family portraits—without overdoing it. From instruction to submit-processing, we’ll walk through expert techniques, tips, and gear to make certain your very last photographs are both natural and breathtaking.
Why Studio Editing Matters in Family Photography
Studio pictures give a managed environment—ideal lighting, backgrounds, and no climate surprises. But despite all this,managedge, uncooked snapshots can nevertheless feel flat or lack the warm temperature and vibrancy wanted for emotional connection. That’s where the modifying steps come in.
Photo modifying enhances:
Skin tones and textures
Colour harmony and contrast
Lighting balance
Background distractions
Emotional impact
In circle of relatives pictures, modifying is particularly critical because of the fact you’re working with a wide range of topics—kids, adults, and once in a while even pets. Each challenge requires careful attention, and modifying enables creating a cohesive and flattering final picture.
Step 1: Capture with Editing in Mind
Before you even open an editing app, your editing achievement starts with the way you shoot the image.
Choose the Right Background and Lighting
In studio settings, use soft lighting fixtures—ideally from softboxes or umbrellas—to calmly light up faces and reduce harsh shadows. Light positioning is prime: vicinity lighting at 45-degree angles to avoid flat lighting or deep shadows.
Neutral or stable colouration backdrops work nicely for families. Grey, beige, white, or pastels permit the own family’s garb and expressions to polish whilst also supplying you with more flexibility at some stage in modifying.
Outfit Coordination Helps Editing
Encourage families to wear coordinated outfits—no longer identical, however complementary in colouration and fashion. Avoid strong styles, emblems, or neon colouring that causes a colour cast or distractions in the course of editing.
Pose for Natural Interaction
Direct households into poses that display connection—conserving fingers, hugging, guffawing, or even gambling with a toddler. Natural interactions always translate better throughout editing, especially while you’re improving expressions or adjusting composition.
Step 2: Start Editing with the Right Software
Choosing the right enhancing equipment is crucial for beautiful, expert-looking effects.
Recommended Software
Adobe Lightroom Classic – Great for colouration correction, batch editing, and international adjustments.
Adobe Photoshop – Ideal for specific retouching, pores and skin smoothing, and history edits.
Capture One Pro – Loved by way of experts for colour accuracy and tethered photography.
Luminar Neo / ON1 Photo RAW – User-friendly options with sturdy AI tools.
Each software has strengths, and plenty of photographers use a mixture of Lightroom and Photoshop to get the pleasant of both worlds.
Step three: Basic Adjustments to Build the Foundation
Start with global edits that affect the entire picture before moving on to finer details.
Adjust Exposure and Contrast
Ensure the photograph is nicely exposed. Use the histogram as a guide—keep away from clipped highlights and shadows. Increase the assessment slightly to give the image depth.
Fine-Tune White Balance
Accurate pores and skin tones are important. Use the white balance tool to remove any colour casts, particularly if the studio lighting changed into a combined or unbalanced state. Aim for natural, heat tones that complement your own family’s place.
Adjust Highlights and Shadows
Bring down highlights to get better information in bright regions (like white shirts or mild backgrounds). Lift shadows gently to show info in darker garb or facial capabilities. Maintain balance without flattening the picture.
Step four: Perfecting Skin Tones and Details
This is where the enhancement becomes extra creative. You want to keep natural texture at the same time as subtly enhancing beauty.
Skin Retouching
Use tools like Spot Healing Brush, Clone Stamp, or Frequency Separation in Photoshop to smooth up blemishes, stray hairs, and small distractions.
Avoid over-smoothing. Families want to appear like their actual selves—just polished, no longer plastic. Keep skin texture seen, especially on adults and kids.
Brighten the Eyes
Eyes are the focal point of images. Gently decorate the whites of the eyes and convey the colour within the irises the use of dodge and burn or adjustment layers. Be diffused—overdone eyes can look unnatural.
Soften Lines and Wrinkles (Gently!)
You can melt harsh lines or below-eye shadows slightly; however, avoid putting them off completely. This is particularly essential whilst editing grandparents or older adults. The purpose is to beautify, no longer erase.
Step 5: Enhance Colour and Tone for Emotion
Family photographs have to sense of warmth, gladness, and inviting. Use colour grading and tone adjustments to create a mood.
Colour Grading for Harmony
You can apply warm tones in highlights and cooler tones in shadows for a balanced appearance. Use the Colourr Grading tool in Lightroom or Selective Colour in Photoshop to target unique colours.
Make sure skin tones stay herbal. A not unusual mistake is over-warming the photograph, turning skin orange or overly yellow.
Vibrance vs. Saturation
Increase vibrance in place of saturation to maintain colours rich but realistic. Vibrance boosts mutecolours without affecting already saturated regions (like pink shirts or pink cheeks).
Step 6: Add Creative Touches (But Keep It Classy)
Creative edits can elevate a family portrait from ordinary to clever—but be cautious, don’t go overboard.
Vignette for Focus
Apply a gentle vignette to draw interest to the own family. A subtle darkening of the corners helps guide the viewer’s eye to the middle.
Background Blur or Cleanup
If history has seen seams, wrinkles, or marks, use the clone stamp or healing brush to clean them up. You can also observe a tender blur (Gaussian blur or lens blur) to simulate a shallow depth of discipline.
Artistic Filters (Optional)
For a vintage look, tender matte tone, or movie-style impact, apply a filter or preset. Keep these results minimal to maintain the undying experience of family photos.
Step 7: Crop, Frame, and Export
The final steps are just as vital as modifying. Your crop and export settings can make or smash the final presentation.
Crop Thoughtfully
Use the rule of thumb of thirds or targeted composition, depending on the pose. Make sure no heads, limbs, or fingers are awkwardly reduced. Leave respiration room across the circle of relatives, especially if the photograph can be printed.
Choose the Right Export Settings
For printing: Export in TIFF or JPEG, three hundred DPI, Adobe RGB or ProPhoto RGB.
For web/social media: Export as JPEG, seventy two-150 DPI, sRGB colour profile.
Name files professionally and prepare by means of patron call/date to stay organised.
Common Mistakes to Avoid
Even nicely-edited snapshots can fall flat in case you make these common errors:
Over-smoothing skin: Creates unnatural, plastic pores and skin impact.
Over-whitening teeth and eyes: Makes the circle of relatives look ghostly.
Excessive assessment or clarity: Can age subjects and flatten colourings
Colour inconsistencies: Each photograph in a hard and fast ought to have the same warmth and tone.
Ignoring backgrounds: Messy backgrounds distract from your subject.
Cropping too tight: Always leave away space for printing, framing, or design.
Final Thoughts: The Art of Beautiful Family Photo Editing
The first-rate family picture edits are those that go unnoticed. They’re the enhancements that make viewers say, “Wow, what a beautiful family!”—without figuring out how a good deal of effort went into creating that final photo.
Studio circle of relatives photo enhancing is a talent that mixes technical understanding, artistic eye, and emotional sensitivity. You’re not simply modifying pixels—you’re honouring your own family’s legacy. A desirable edit makes them proud to show their picture in their residing room, gift it to loved ones, or frame it for generations to return.
So whether you’re simply starting or seeking to degree up your abilities, take into account this: the quality editing doesn’t shout—it whispers. It complements what’s already there, celebrates connection, and we would love to take a middle degree.
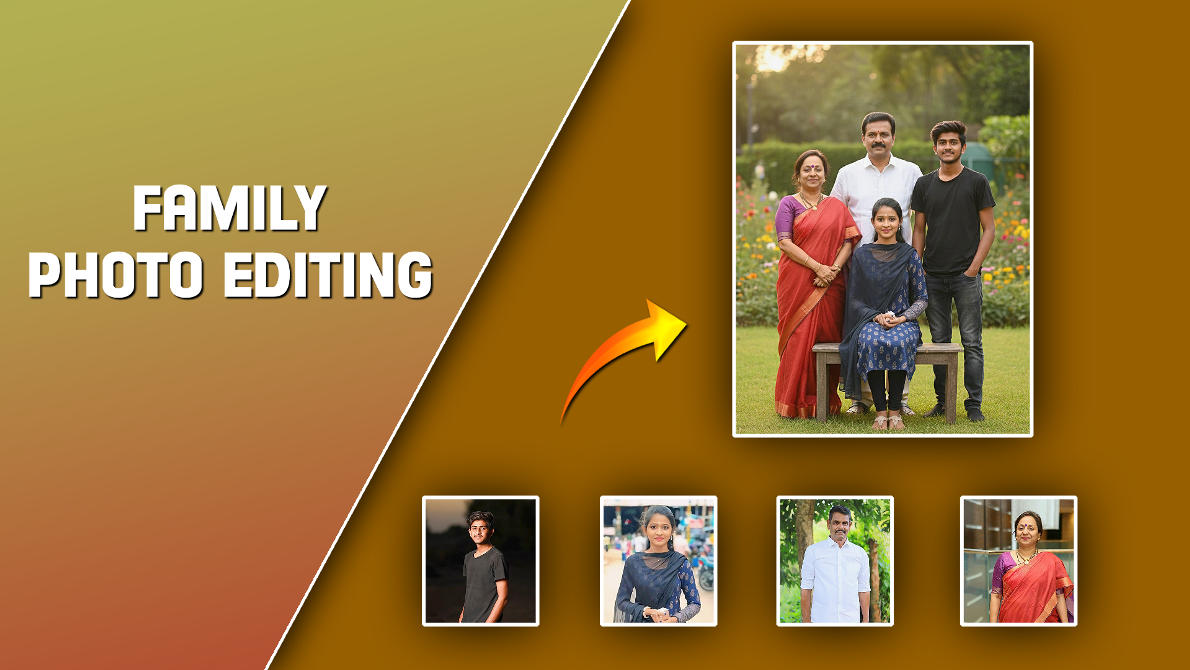
PROMPT HERE
“Ultra-realistic proportional family group photo, merged from uploaded pictures. Everyone blended naturally, consistent lighting and shadows, proper proportions, cohesive skin tones. In an greenery open space— standing or sitting ,timeless professional portrait.”