Understanding the Concept of the Dispersion Effect
The dispersion impact, also referred to as the disintegration or pixel explosion impact, is one of the most visually charming varieties of cutting-edge photograph manipulation. It creates the phantasm that a subject in a photograph is breaking apart, dissolving, or exploding into tiny particles. This impact is widely used in innovative images, poster layout, advertising, and virtual artwork because it adds a sense of movement, emotion, and drama to an in any other case static photo. The idea is simple, however effective: it transforms a normal photograph into something that appears dynamic and alive, making the viewer sense as if the concern is within the process of vanishing or transforming into dust or pixels. Understanding the common sense behind the dispersion impact facilitates creating extra convincing and visually balanced edits. Essentially, you are breaking down a stable form into scattered fragments using brushes, layer masks, and blending techniques that imitate natural disintegration.
Choosing the Right Photo for the Effect
The niceness of the very last dispersion edit depends closely on the selection of the photo. A clear, high-resolution picture with a well-described issue works satisfactorily because the dispersion approach is predicated on seen details and clean edges. Portraits are the maximum famous preference for this impact, considering human subjects provide sturdy focal points, and the disintegration of a person adds emotional depth and storytelling to the paintings. However, the effect can also be applied to gadgets, animals, or maybe abstract shapes. When deciding on an image, it’s essential to make sure that the background does not distract from the main challenge. An easy or blurred heritage makes it simpler to isolate the situation and manipulate the path and glide of the dispersion. Good lighting fixtures additionally enable to beautification of the realism of the particles and the shadows they cast. If the lighting fixtures are choppy or too harsh, it would require more adjustment later during the modification procedure to keep consistency.
Preparing the Image in Photoshop
Before beginning the dispersion effect, the image needs to be nicely prepared in Photoshop or another advanced photo editing software program. Begin with the aid of establishing your chosen photo and duplicating the original layer. This step guarantees that you can constantly revert to the unedited model if needed. Next, use a tool like the Quick Selection Tool or the Pen Tool to carefully choose the difficulty. Refining the choice edges is important due to the fact that any tough or jagged definition will become major once the dispersion impact is carried out. After making the selection, separate the issue from the background by way of growing a new layer through replication. This isolates the principal detail, giving you complete control over the parts on the way to dispersing. You can then use the Healing Brush or Clone
Duplicating and Masking the Subject
Once the problem is isolated, the next step is to replicate the layer. The first layer will continue to be the intact challenge, whilst the replica may be the one that you distort and use to create the dispersion effect. Apply a layer mask to the duplicated layer to allow non-damaging editing. Using masks as opposed to erasing components of the photo gives you the flexibility to alter or make opposite changes at any point. This is particularly helpful when fine-tuning the path and density of the disintegration. Think of the mask as a transparent sheet over your photo that you can paint on to hide or screen particular components. Black hides the layer, white reveals it, and sunglasses of grey allow partial transparency. This control helps in mixing the dispersion seamlessly with the authentic shape, preserving a realistic transition between the strong and scattered regions.
Applying the Liquify Tool for Motion Direction
To make the dispersion appear herbal, it’s critical to first distort the replica layer in the direction in which the debris will appear to transport. This is where the Liquify Tool becomes crucial. With the duplicated layer decided on, open the Liquify workspace and gently drag the pixels outward in the supposed path of the dispersion. For example, in case you want the particles to appear as if they’re blowing away to the right, drag the outer elements of the challenge in that path. This stretched model of the difficulty serves as the basis for your particle dispersion. The movement created with the aid of the Liquify Tool gives a sense of power and motion, making the impact extra dynamic. Be subtle with the liquify changes to avoid unrealistic distortions, specifically recognisable features like the face or hands. The intention is to create flow and direction.
Creating the Dispersion Brush
The brush is the heart of the dispersion effect, as it determines how the scattered debris will appear. You can download dispersion brushes online or create your own. To make one from scratch, begin with a blank canvas and paint small random shapes using the tough spherical brush or spatter brush presets. Then, visit the Brush Settings panel and regulate parameters like Shape Dynamics, Scattering, and Spacing to make the brush create a scattered impact with varying particle sizes. Save this custom brush by clicking “New Brush Preset.” Once your dispersion brush is prepared, you can use it on layer masks to steadily make parts of your problem disappear. The secret is to vary the comb size and opacity as you paint, which offers the phantasm of depth and randomness, similar to particles breaking away at one-of-a-kind distances.
Painting the Dispersion Effect at the Mask
Now that you have your brush equipped, it’s time to bring the dispersion into existence. Select the layer mask of the duplicated, liquified problem layer and use the brush to colour with black in the mask. As you paint, the pixels from the liquified layer will vanish within the course of movement, revealing the stable layer under. This creates the illusion that parts of the situation are disintegrating into the air. To refine the impact, switch between painting with black and white to control the visibility of certain areas, making sure the dispersion flows obviously. Focus greater debris at the edge where the disintegration begins and step by step reduce them as they circulate outward. The more versions you introduce in particle density and length, the extra realistic and visually appealing the effect turns into. Patience is fundamental to this degree, as small information make a huge difference in the outcome.
Enhancing the Effect with Additional Particle Layers
For a greater dramatic and designated dispersion, you could create new layers dedicated to including greater debris. Use your custom dispersion brush to colour small dots and shapes manually in the direction of the motion. Choose colours that suit or complement the tones of your situation to make the debris blend seamlessly. Using multiple layers for specific particle sizes permits you to create intensity through adjusting the opacity and blur of each layer. You can apply Gaussian Blur to some layers to simulate particles that are out of focus or, in addition to the digital camera, at the same time as retaining others sharp to seem closer. This aggregate of sharp and soft particles provides realism and gives the feel that the dispersion is taking place in a three-dimensional area. Experiment with blending modes consisting of Screen, Overlay, or Multiply to obtain the high-quality visible stability between the debris and the heritage.
Adjusting Colours and Lighting for Realism
After developing the dispersion, it’s crucial to unify the tones and lighting fixtures across the photo. The dispersion particles have to seem like they belong to the equal lighting surroundings as the primary concern. You can use Adjustment Layers like Colour Balance, Levels, or Curves to first-rate-track the brightness and colour harmony. Applying a Gradient Map with soft blending can assist in introducing creative tones that make the picture extra cinematic. Light route performs a huge role as well; if the difficulty is lit from one side, make certain the dispersed debris is brighter on that identical side and slightly darker on the opposite side. You can also add a gentle light flare or dust overlay to beautify the surroundings. These subtle enhancements tie the composition together, ensuring that the dispersion doesn’t look like a separa
Adding Shadows and Depth for a Professional Finish
Shadows give intensity to a picture, grounding the concern and making the dispersion effect more plausible. You can create shadows manually the using a soft, round brush on a brand new layer beneath the challenge, painting with a low-opacity black colour. Adjust the blur and opacity to fit the mild conditions of the unique picture. If the dispersion is heavy on one facet, the shadow ought to additionally subtly reflect that movement. For instance, particles breaking off on the right may solid faint, elongated shadows in that course. This attention to bodily realism distinguishes a professional-exceptional dispersion effect from a newbie one. Additionally, you can beautify the intensity notion by selectively sprucing the foreground elements and slightly blurring the historical past, creating a shallow intensity-of-field impact that mimics natural images.
Experimenting with Backgrounds and Textures
Whileana’s undeniable historical past works nicely, adding textures or new backgrounds could make the dispersion effect even greater. For instance, replacing the original history with a smoky, cloudy, or abstract texture can intensify the feel of movement and power. You can also experiment with gradient backgrounds that transition from darkish to mild, which helps draw attention toward the dispersed area. The secret’s stability — the historical past has to support, not overpower, the principal subject. Using blending modes like Soft Light or Overlay lets in textures to have interaction subtly with the picture, making them experience incorporated instead of synthetic. Colour concord among the problem, particles, and historical past ensures that the general photograph remains cohesive and visually appealing.
Fine-Tuning and Final Adjustments
Once all the fundamental outcomes are carried out, the final step is refinement. Zoom in and inspect every detail to correct any harsh edges, unnatural distortions, or inconsistencies in lighting fixtures. You can use the Smudge Tool lightly to adjust stray debris and align it better with the route of motion. Check the general composition to make sure the focal point stays on the situation and that the dispersion doesn’t dominate the body excessively amount of. Applying a final layer of shade grading facilitates unifying all of the visual elements. A diffused vignette around the edges can, in addition, emphasise the significant subject and add cinematic flair. Saving the report in an excessive-resolution format, which includes PNG or TIFF, preserves the quality for printing or posting online. It’s additionally clever to keep a PSD model with all the layers intact for destiny modifications or alternative variations.
Creative Variations of the Dispersion Effect
Once you grasp the basic method, you can explore creative versions to make your dispersion edits specific. You might strictly combine the effect with double exposure, turning the debris into light trails, or mixing them with geometric shapes. Using exclusive particle textures like shards, smoke, or virtual pixels can dramatically change the style. Some artists even animate the dispersion impact in short videos the usage of Adobe After Effects, creating enthralling movement sequences. The versatility of this method lies in experimentation. Each photo and challenge gives a new opportunity to convey the impact differently, whether to arouse pace, mystery, transformation, or emotion. The greater you experiment with brushes, angles, and mixing modes, the more special your creative signature will become.
Why the Dispersion Effect Remains Popular
The enduring reputation of the dispersion effect comes from its ability to mix simplicity with a highly visible effect. It tells a tale of alternate, strength, or emotion with only a few well-crafted edits. It’s frequently utilised in promotional posters, song album covers, sports images, and social media visuals because it immediately captures attention. The impact additionally represents a fusion of photography and virtual artwork, showcasing the innovative possibilities that present-day modifying tools offer. Even though it’s been around for numerous years, artists continually find new ways to reinterpret it, keeping it relevant in layout traits. Its adaptability across exclusive subjects, moods, and colour schemes guarantees that it never genuinely goes out of favour.
Conclusion
Creating a dispersion impact in image editing is a worthwhile technique that mixes technical skill with artistic imagination and prescience. From selecting the right photo to refining the final details, every step contributes to transforming an everyday image right into a dynamic piece of virtual art. The splendour of this effect lies in its flexibility — you may make it subtle and poetic or formidable and explosive, depending on your innovative motive. Mastering the dispersion method no longer best complements your Photoshop abilities but also expands your visible storytelling toolbox. Whether you’re enhancing for professional tasks or personal experiments, the dispersion impact remains an undying way to specific movement, emotion, and creativity through photography. As with any artwork form, practice and experimentation are key, and with every edit, you’ll develop extra management and creativity in crafting breathtaking disintegration visuals..
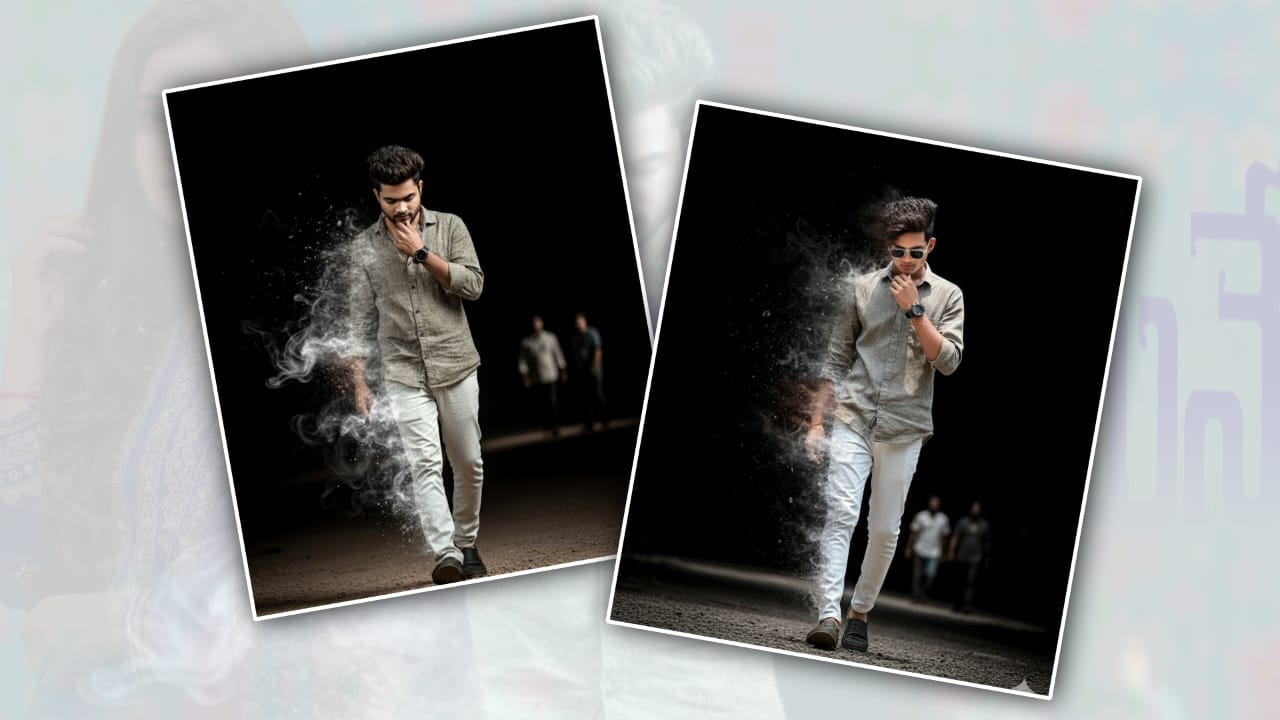
Prompt
A man (based on my photo) walking, lleft foot forward], head slightly tilted downward, staring at the ground as if expressing desolation. His left arm is directed toward his chin, suggesting he’s deep in thought-or to draw attention to his watch He is walking, and as he moves forward, he gradually disintegrates into smoke [from his left sidel, symbolizing the loss of his personality as he trusts. A black background with a slight white blur in the distance A dusty, glossy ground with small pebbles A grunge and cinematic effect A light source coming from his disintegration side, highlighting the direction of the smoke he’s turning into Barely visible silhouettes walking in long-exposure blur mode Outtit: Grey Beige linen printed Shirt and White trousers with matching accessories and sunglasses